DIY HALTER TEE

Who hates wearing boyfriend tees?

They’re comfortable, warm, cozy, and romantic as well.

And isn’t it even cooler if you can get a chic halter top from your boyfriend’s t-shirts in a few minutes?

Cute DIY Tee Shirt - Halter Neck

It feels intimidating to pick up a pair of scissors and begin slicing a t-shirt. But we’ll let you know how you can work with your boyfriend’s tee and make an incredibly looking halter neck you can put on while having fun in a café or on the beach.

To make this beautiful gorgeous halter tee you’ll require the following:

A pair of scissors.

A medium-sized men’s t-shirt.

Chalk.

The essential part of the activity is having that men’s t-shirt. So make sure you steal one from your boyfriend and ensure you steal the best-looking one. With that you’ll be well-poised for success – well begun is half done.

The following are the detailed steps of how to go about it:

Step I: Place it on a flat surface and pick chalk.

Step II: Mark the lines as you can see in the picture.

Step III: Begin cutting as you follow the drawn line.

Step IV: After completing the front side, turn the tee and mark the backside. Take care not to shred the front part of your tee. I know you don’t want that.

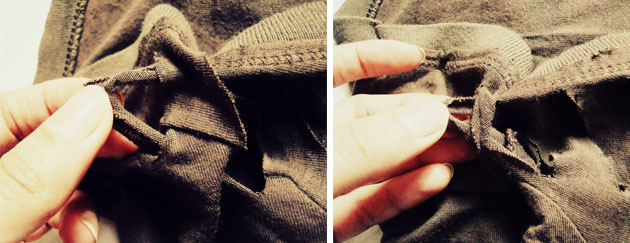
Step V: Cut and discard the cone-shaped cloth from the back, following the pictures.

Step VI: Cut according to the dotted lines, and you get the straps you’ll tie to the back.

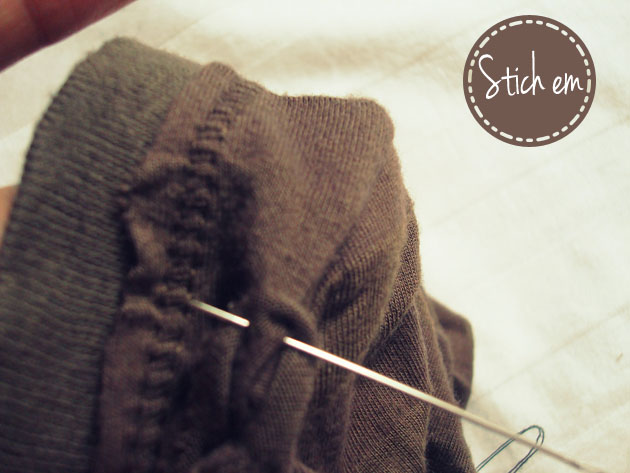
Step VII: Twist the strips after a little tug. This twisting helps prevent the tee from sagging at the back allowing it to fit tightly.

Step VIII: Pull the straps at the front and criss-cross them, wrap around them the neck, and then tie properly.

It’s just awesome how you can come up with a nice top from a guy’s tee! Try it and inform us how it worked for you. Good luck!

This article is written by one of the members of a grease trap company in Chicago, IL. 

Read More

DIY HAIR CHALK

Love color in your hair but have the tendency to get bored of it almost the very next day?

For everyone who want color in their hair but shy away from the very thought of it because it can ruin your hair?

This tutorial is just what you need. Easy DIY Chalk hair would give you gorgeous colorful hair that you want and this being temporary, can easily be washed off by end of the day giving you choice to experiment with it more often. Are you excited enough? So let’s get this started.

You would need

Pastel Chalk

Curling Iron (Optional)

Water Spray Bottle (Optional)


BRUNETTE HAIR CHALK GUIDE

Step I : Take the hair spray and wet small areas of your hair, mostly the ends

Step II: Run colored chalk on your hair from top to bottom till the time you dont receive your desired color effect

Step III: Experiment with colors

Step IV: Let the colors dry

Step V: Use hot iron your hair to lock the colors for a temporary time span. This is required for darker hair for the color to be visible more prominently.

BLONDE HAIR CHALK GUIDE

If you are a blonde, you probably don’t need all these steps. All you gotta do is take the chalk, color the edges with your favorite colors. Go ombre if you want and you are done. The color would easily show up on your hair.

ombre hair trends

You can let your hair loose or try various style with this. If you are going for fishtail braiding. You can probably do the braiding first and run the chalk on it later. It might mess your hair up a little. But what good is messy fishtail braiding for anyways, if not for this! Oh and don’t forget to wash it off, end of the day!

diy fishtail braiding hair chalk tutorial
 
Read More

DIY BRAIDED TEE SHIRT

Anyone around who doesn’t have plain colored t-shirts stuffed somewhere in a corner of their wardrobe? Plain tees are great things to wear- can be paired with sooo many things, are great for color blocking and are absolutely versatile. But if you are going to wear plain tees does not mean they have to be boring! You can spruce up a neglected tee in the blink of an eye, and it will be new all over again. So get your t shirts ( not just plain ones, just about any t-shirt you want to revamp) while we show you how to make your very own braided neck tee shirt, and then click lots of pictures with your guy because you’ll be looking really cute wearing your “new top”..!! Here we go!

Complete DIY Tutorial for Braided Tee Shirt Making

You’ll need

A Tee-Shirt

Scissors

Coordinating Thread and Needle

Chalk

Here are your Detailed Steps

Step I : Lay out your old tee flat on the surface

DIY Old Tee Projects

Step II : Start by marking the slits you have to cut. You can go freehand here too, but if you’re doing it for the first time, it would be a good idea to mark them with a chalk. Its not a science experiment, so don’t worry too much about being accurate.

DIY Braided Tee Shirt

Step III : We have marked approximately 2-inch slits placed a little under an inch apart. The length of the slits and the distance between them will change the thickness of the “braid”. Cut the first slit half the length of the others, because all the pulling will enlarge it a bit.

DIY braided Tee Tutorial - Easy Guide

Step IV: Once all the slits are cut, we begin the braiding. It’s really simple, and if you think you have gone wrong, just begin again. To braid, take the strip # 2 and push it under strip #1. Pull the loop that is formed in the direction of the slits and push strip # 3 inside the loop, and so on.

DIY Braided Tutorial for Old Tees

Step V : Braid all the loops and fasten the final loop to the t-shirt with a thread. If you find a little hole near the first loop, stitch it up a little.

DIY tutorials for stuff you can do with your old tees!

Step VI : Don’t worry if it looks bunched up, because it is a part of the look. The top will fit you perfectly!

So go ahead, bring out your magic wand and transform plain tees by braiding them. Once you get the technique, you can braid the sleeves too! Have fun running scissors over your tees. And till then, keep it chic!

This article was written by a concrete contractor in Corpus Christi, not just a skilled concrete contractor but also skilled in reworking clothes. 

Read More

FASHION PATROL : Kim Kardashian in Pink Pop

The American Socialite, Kim Kardashian was seen looking stunning in the casual mode. She was also present in Chic Factor’s Best Dressed Celebrities of 2012.

She was wearing Equipment star print silk crepe de chine shirt with black jeans. The spotlight was on her Christian Louboutin Daffodile shoes in pink which re-invented the black and white look. She completed the look with Belle Noel star rings (her own jewelry collection) and Gucci sunglasses.

Your Fashion Patrol

You can nail the Black and white look by pairing any printed white shirt with black jersey pants, Chic Factor Store’s The Princess Prairie pumps, shades and a black tote.

What do you have to say about her outfit?

Keep it Stylish 

Read More

DIY – Glitter Pumps

Shoes are girls Best Friend! Who doesn’t know that,right? Well, if we can make some thing  more out of the already sexy shoes all by ourselves then how cool is that?! So Here is a DIY to add a little more to our  pumps.

Things You Need :

a. Glitter Spray.

b. A Pair of sexy Pumps.

c.Some Paper to wrap.

How To :

Step 1 : Here we are adding glitter to the heel of the pumps. Getting your  equipment ready is the first thing you need to do.

Step 2 : Cover the pumps completely or mostly at the rear part as we don’t want any glitter to get on anywhere else.

Step 3 : Take the Glitter spray and cover the heel completely with it and that’s it ! Its that simple. You now have glitter pumps.

Try it at home and lets rock those shoes girls!Till next time… 

Read More

DIY Glitter bracelet tutorial

Glitter makes us happy. And a lovely DIY to go with it just makes it so much more better. If you read and did our DIY Glitter Shoe Tutorial, this one would be a piece of cake!

So, Ready to make things around you glitter a wee bit more girls? 😉

And Here’s What You’ll Need :

a. Plate

b. Brush

c. Glitter (Loads of It)

d. Old Bangles

e. Fabric Glue

Steps :

Step I . Take the glitter out in a bowl or plate.

Step II. Dip in your brush into the fabric glue and paint a thick

Step III. This is my favorite step. Sprinkle Glitter all over the bracelet. Be sure to not leave a spot undone. Place the bracelet on the plate while doing it. Would help you catch the extra glitter 🙂

Step IV: Let it dry!

And here’s another set of bracelets that have been Glitterified 😉 In this, two different glitters have been mixed to get that effect. Amazing right?

DIY Glitter Bracelet Complete Tutorial
In case you miss out a few spots, apply some fabric glue and sprinkle glitter right on it till the time you get it right 🙂

Let us know how it turned out for you girls.

Happy Glittering! <3 

Read More

HOW TO WEAR HIGH-LOW HEM TREND

High-low hem blouses, tops, skirts and dresses are an excellent way to add length and accentuate your curves. They are a stylish version of sheer blouses which could be worn any day and on any occasion. Let’s take a look at the simple ways on how you can pair high-low hem outfits for different occasions but before that, you need to know what “high-low hem” is.

A High-low hem is a type of design of hem wherein the front one is shorter than the back; creating a flattering virtual image.

What are the options and how to wear them?

The Not-so Casual tops

Casual isn’t casual when we talk about high-low tops. These come in slight sheer and patterned texture which gives it a pastel shade.

How to wear- They could be easily carried with shorts and jersey pants.

Colors- Choose lighter shades like beige, powder pink, green, lemon yellow etc.

Accessories- For an edgy look, carry a set of silver bangles or Just a tote and flats would be great.


Sweater-shirt

If this look doesn’t turn eyeballs then none of the below ones would! It is bound to make you divine and ought to look sexy. This gives you liberty to jump and dance while looking chic. 😉

How to wear- Team a light/dark colored high-low jumper with a different tone/patterned shirt. Finish with basic denims in moccasins.

Colors- Mint, royal blue, fuschia and caramel.

Accessories- A satchel bag and arm patty is enough for this look.


Dresses

Everyone is talking about high-low hemline dresses with cut-out backs. It is a life savior of last minute dates and outdoor parties.

How to wear- To give meaning to a slimmer waist, wear a thin belt in the third color (if there are two).

Colors- Peach, lavender, black, burgundy, orange and more.

Accessories- Belt, rings and cuffs.


Skirts

And we have a winner of high-low hemlines. Skirts are a fashion staple for practically any girl. High-low skirts? A twist!

How to wear Pair a sexy off-shoulder/bustier top with neon high-low skirts for a devious look. Throw a leather jacket to add some sequence to your appeal.

Colors- Hot pinks, mint, burgundy, yellow, electric blue!

Accessories- Pull of this look by a printed envelope clutch and ankle length boots.


We hope you’re enjoying reading the articles 🙂

Dress Tasteful 

Read More

DIY – LEARN HOW TO MAKE MESSY TOP KNOT

he Messy Look –  we  wrote a couple of posts about how messy buns and top knots are just the perfect hair styles.What ever might the occasion be, a day out shopping with your friends? lazy college day?summer heat bothering you  then here is a quick hair style for your rescue.

THE TOP KNOT!

Looks perfect! Doesn’t it?! Not only is it pretty but its very easy and quick to do.

Here are a few quick steps to learn how to do it !

Steps To Get The Top Knot :

1) Make a High  pony tail at the top of your head

2) Take a brush and comb your hair all the way through and tease it a bit if you have perfect straight hair so that it becomes a little wavy and messy.

3) If you don’t have a lot of volume then tease the strands of your hair a lot more so that it will look fuller.

4) Twist the hair around your hand and around the bottom of your pony tail ( Look at the picture.)

5) Pull the end of your hair through this as shown in the picture and make a knot or put in few pins in the insides or a small clutch.

6) Tease your hair again and style the top knot. Pull out few strands and spray some hair spray if needed.

Thats it! You now know how to make the Top Knot hairstyle.Easy and quick, this is a perfect hair style to master! Share it with your friends and don’t forget to tell us how it turned out.

Hope You liked the post. Till next time, 

Read More

MAYBELLINE NAIL LACQUER COLLECTION: COLOR SHOW

For a girl who is constantly involved with fashion and knows how to style herself in any outfit. Who is always on-the-go yet has to look her best whenever she steps out:- Maybelline New York’s latest Nail Lacquer collection- Color Show is for Someone like you. There are 4 excellent collections to drool at, let us take a look at all of them.

Bold & Crisp

These colors my ladies, you are sure to fall head-over-heels in love with! These are bold, matt (some glossy), perky, vivacious and have the right amount of quality and quantity. Some of our favourite colors are- Coral Crush, Fuchsia Fever, Fierce N Tangy, Go Go Green and Orange Fix.

The Denim Collection

The girls who want to look trendy in catwalk denims and killer washes; these are the colors for you! They don’t give you blue in ‘those blue days’ and are perfect for a sexy glossy appeal. Colors available are- Styled out and Denim Dash. There are some limited edition sparkle colors available too which we think are awesome!

The Metallic Collection

Aptly described as High fashion shades with a heavy-metal edge, these colors give a right blend of elegance and sophistication. The four colors are- Amethyst Ablaze, Bold Gold, Navy Narcissist, Blue Blowout.


The Shredded Collection

For girls who want everything spiced up in one bottle should look out for this one! These heavily shredded nail lacquers come in four shades- Carbon Frost, Silver Stunner, Majenta Mirage, Purple Possibilities which upon application on any base color; shred like shredder!


So what does our Chic Factor girl like?

Vote now! 

Read More

VALENTINE’S DAY: Red designer label

Its Valentine’s Week everyone and we decided to do something very different: non-traditional Valentine’s Day post! You have read what couples can do on Valentine’s Day, What to gift to your boyfriend, what to gift to your girlfriend, Gifts for everyone for Valentine’s Day, How to propose, where to propose and our recent one being, What to wear on Valentine’s Day. Now here’s a post about what designers are speaking~ A Color Code that is RED!

That’s right! We have picked five great designers of all time and introduced their recent collections which were in RED. Red, the color of Love which is going to be a big hit in 2013 is already been seen on Runways. Let’s see what Desginers have in store for us:

Georges Hobeika

Being written about for the very first time in Chic Factor, the Lebanese Fashion designer’s Fall/Winter 2013 couture collection so the likes of raspberry reds in mainly chiffon, lace and tulle. There was précised embroidery on lace and delicately cut roses.

Oscar de la Renta

The Blunt red captured our eyes as the designer presented an array of appliqués in red in his Resort 2013 collection.

Zuhair Murad

The illusioner’s Pret-a-porter aka RTW spring/summer 2013 collection was more of draped gowns and plunging necklines. The whole collection was beautifully presented.

Valentino

The Master of Red Romance showed us how it is done in off-shouldered pieces. Lace, tulle, triple organza, beadings, ruffles and a lot more was seen in carnal red accents.

Elie Saab

The Gorgeous Spring/Summer 2013 collection of Elie Saab saw cady, lace, guipure application accompanied with poppy sleeves reminded us of a rich red velvet cake.

Who is your Favorite RED Designer? Let us know 

Read More